Printable Recipe Card Template For Blogger


MY RECIPE NAME

My recipe description.


Prep Time: 0 mins

Cook Time: 0 mins

Total Time: 30 mins

Makes: 0 to 0 servings


INGREDIENTS


  • My recipe ingredients


`


INSTRUCTIONS


  1. How you make my recipe.


NOTES --------------------------------------------------------------------------------


Here are my notes about this recipe.


I wrote this tutorial after I successfully designed, uploaded and linked my own printable recipe card for my blog on Blogspot/Blogger.  Blogspot/Blogger doesn't have a widget for plug-in for making printable recipe cards and trying to find one online is nearly impossible unless you want to pay a monthly fee, which I don't.  So, I set out to design this template that could be editable, sharable and printable.  It does take some added work to put a recipe together in the template and then get it linked to a printable document and then added to your blog.  But, don't worry, I will walk you through all of the steps.  It may seem like a lot at first, but once you have done a few recipes using the template, it will become second nature to you and a pretty quick process to get a printable recipe card uploaded onto your blog.  So, grab some tea or coffee and let's get started!


1. SAVING YOUR TEMPLATE TO GOOGLE DOCS


You can edit and use the above recipe template for your own personal use.  Place your cursor on the top of the template shown above, just ABOVE the template outline border. Left-click your mouse and pull down at the same time to highlight the entire template blue. Right-click in the blue area and select copy.  Open up a new document in Google Docs and paste the template into your document.  Name it something like RECIPE CARD TEMPLATE and save it.  Now you have a template that can be used on your website. You won't use this directly for your recipes. You will copy and paste this template in several locations to create your custom recipe cards. Follow all the steps below to learn how.


2. USING THE TEMPLATE ON YOUR WEBSITE


To use the template on your website, first open up a NEW document on Google docs in your browser and a new blog post on your Blogger dashboard, copy and paste your template that you just saved into the Google Doc document and your blog post.  Then on your GOOGLE DOC DELETE the words inside the box.


In your blog post, replace the template words with YOUR RECIPE.  Left-click your mouse INSIDE the template box and pull down at the same time to highlight the recipe words blue. Right-click in the blue area and select copy.  Go back to your Google Doc with the empty template box, place the cursor inside the box and click paste.  Now your recipe is inside the template box and ready to use.  Name it and save it. 


3. Make Your Recipe Sharable

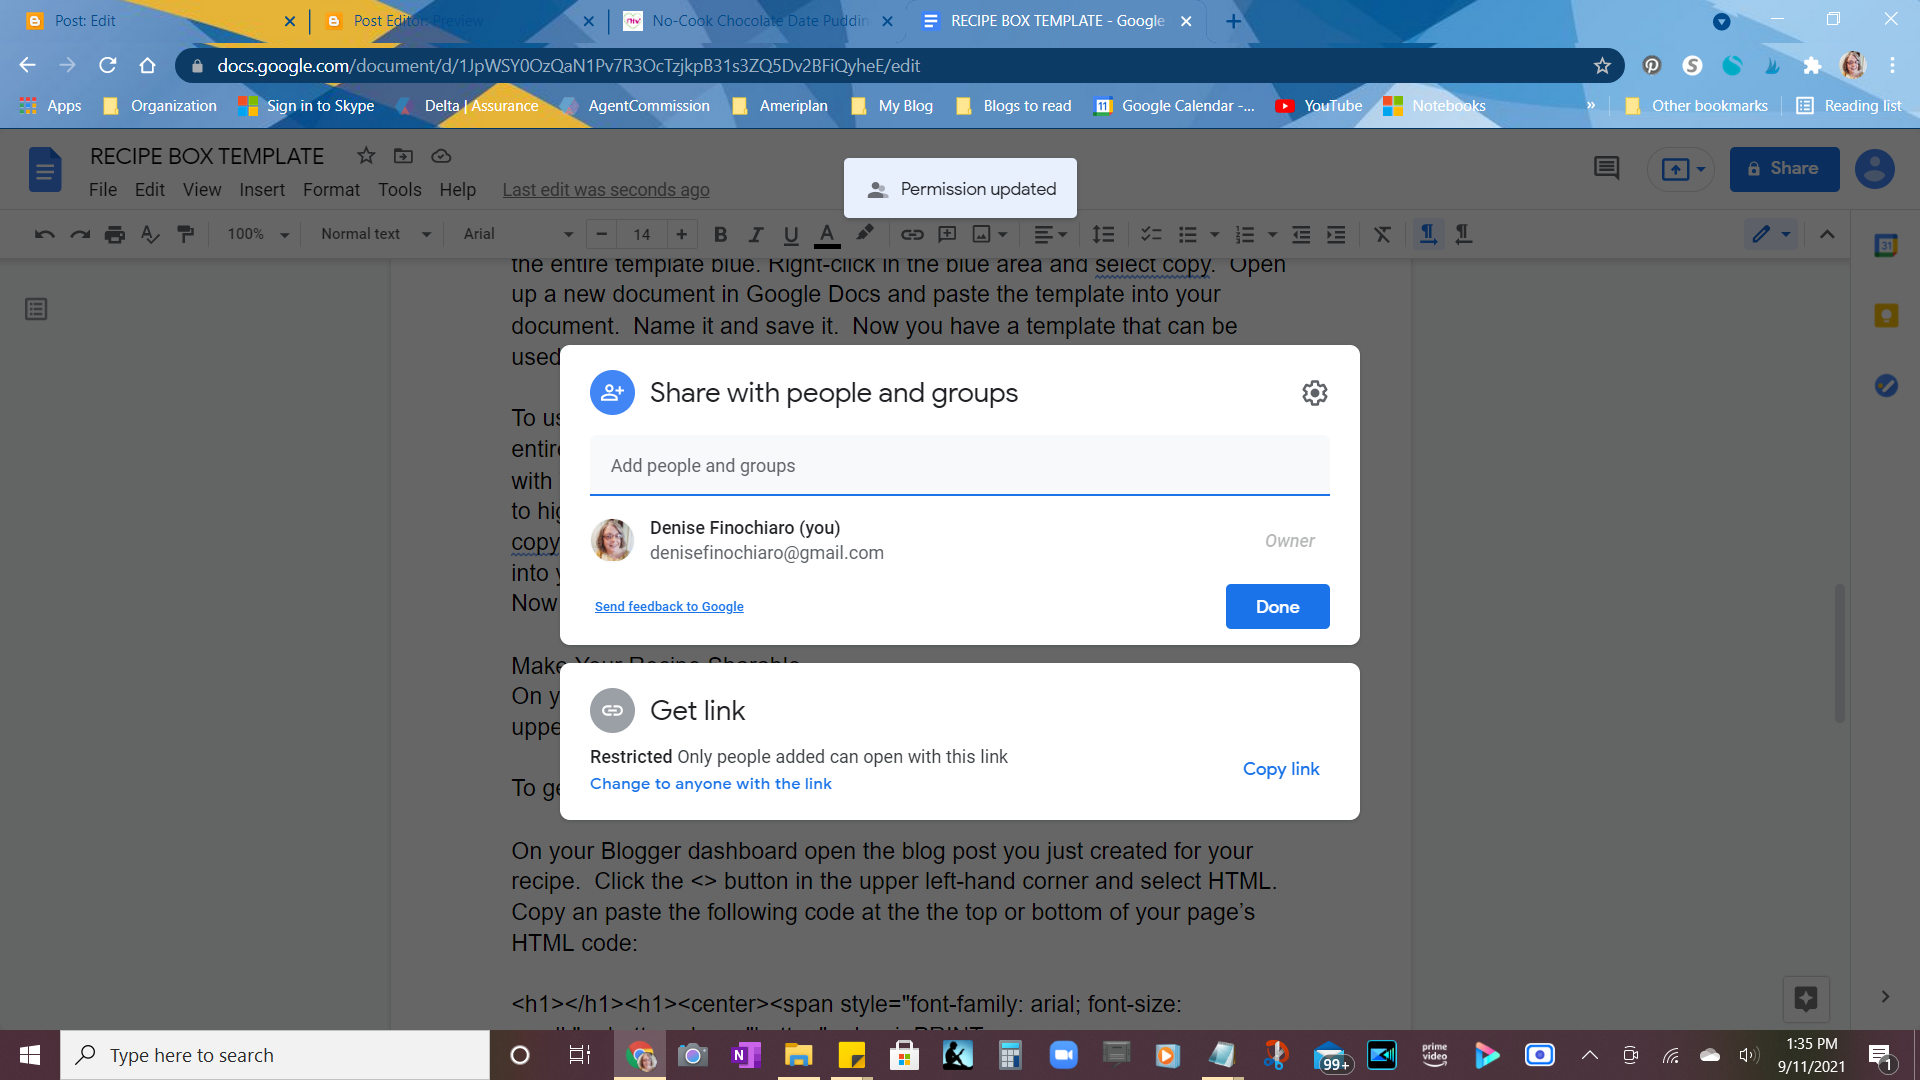
On your new recipe that you just created in Google Docs, click on the blue share button in the upper right-hand corner.  In the pop-up box where it says “Get Link”, click the blue text to change the link so that anyone can view.  Make sure the drop-down on the right-hand side says “Viewer”.  Click “Done” to save your changes.


4. MAKE AND LINK A PRINT BUTTON FOR YOUR TEMPLATE


On your Blogger dashboard open the blog post you just created for your recipe.  Click the <> button in the upper left-hand corner and select HTML.  Copy an paste the following code at the the top or bottom of your page’s HTML code where you want the print button to appear:


<h1></h1><h1><center><span style="font-family: arial; font-size: small;"><button class="button"><b><i>PRINT RECIPE</h1></i></b></span></a></button></center>


Click the <> button in the upper left-hand corner and select Compose. 


You should have a blog post draft that looks similar to this.


Go back to the recipe you want a printable link to in Google Docs.  Click on the blue share button in the upper-right hand corner and click “Copy Link” in the pop-up box.


On your blog post, highlight the text inside the print button.  Click on the insert a hyperlink button in the post toolbar.  Type PRINT RECIPE in the “Text to display” box. Place the cursor on the line that says “Paste or search  for link” and paste the link you just copied from your Google Doc. Click apply to save changes.  The linked text will now be highlighted and underlined.  But the PLAIN, NON-UNDERLINED text inside the button that says, “PRINT RECIPE” will need to be deleted.  Place the cursor inside the button and delete the plain, non-underlined text.  Save changes.  


5. MAKE YOUR RECIPE TEMPLATE MOBILE RESPONSIVE


If you want your recipe template to be responsive, meaning it fits within the parameters of all web browsers in cell phones, tablets, desktop computers, then you can add the following code to your template in your blog post:


style="overflow-x:auto;


Go to your blog post with the recipe template you want to make responsive.  Click on <> to open up the HTML editor for that post.  Look for the code looks similar to this:


<table style="border-collapse: collapse; border: none; table-layout: fixed; width: 468pt;">


Paste the style overflow code above right before the width code:


<table style="border-collapse: collapse; border: none; table-layout: fixed; style="overflow-x:auto; width: 468pt;">


Update to save your changes.


That’s it!  Now you have a simple recipe card on your blog post that not only looks fantastic, but is also printable!  To get social share buttons like I have that can be added to your blog post go to https://sharethis.com.


Did you make this template?  Tag me @wherefoodandfamilymeet on Instagram!

Did you find this blog post helpful?  Share it with your network!


Leave a Reply

Your email address will not be published. Your first name and email address are required. *


By submitting this comment you agree to share your name, email address, website and IP address with Where Food And Family Meet. This information will not be used for any purpose other than enabling you to post a comment.*

Soft Gluten-Free White Sandwich Bread


It's finally finished!!!  After FIVE years I finally developed and perfected my own gluten-free bread recipe using my own personal flour blend!  This bread recipe is a labor of love not only for myself but for all of you who are gluten-free and struggling to make bread that actually tastes good, is not dry or gritty and bakes and smells like REAL BREAD.  That's because it IS real bread.  

No Cook Overnight Ice Cream From Powdered Milk


Do you love homemade ice cream but don't have an ice cream maker? If so, then you are in for a real treat! This recipe is so quick and easy! With just three simple ingredients you can have fat-free, delicious homemade ice cream in less than eight hours. Now that might seem like a long time, but when you don't have an ice cream maker eight hours isn't really that long. All you need is a mixer and your freezer to make ice cream. This recipe is my creation from an old fashioned whipped topping recipe made from powdered milk.

DIY Easy Homemade Bulk Laundry Soap Recipe For Washing Laundry By Hand Or In A Machine


Laundry soap:
4 cups of 20 Mule Team Borax
2 cups of grated Ivory soap

In a large container (I use an old, clean gallon ice cream bucket w/lid) combine and mix the washing soda and borax.  Add the grated soap.  Use your hands to mix and break up the soap shavings in the borax/soda mixture.  Mix well.  Cover with lid.  Use 1/3 powdered laundry soap per load of laundry.  Makes about one gallon of laundry soap.

Don't have a washing machine?  Washing your laundry by hand is not as hard as you might think!  With a few simple household items you can get the job done.


Six Tips To Eating Gluten and Dairy-Free Without Breaking The Bank


1. Define your grocery budget.
             
No matter what kind of eating plan you follow, EVERYONE should have a spending plan for buying groceries.  If you fail to plan then you plan to fail.  Before you lay out your hard earned cash for food,  you need to PLAN ahead before you go to the store.  When you are making your grocery list and reviewing your budgeted amount for groceries you need to be thinking about what you need on your list that is gluten free, dairy free or other types of foods that you will need to replace.  We budget about $400 a month for groceries for our household and out of that I spend about $150 a month on gluten- and dairy-free items.

2.  Shop Smarter Not Harder

Know where the deals are!  Don’t spend all your time hopping from store to store searching for the best deals or just looking for the special foods that you need.   Most grocery stores have websites these days, use those to your advantage ahead of time.   Check out those sites and see what they have available to you based on your needs.  A lot of stores also have specialty sections for gluten-free, dairy-free or other non-allergenic foods.  Save yourself some time and know where those are.  I also keep a price book for my specialty foods.  I list the store, what I bought, what aisle it was on and how much it costs.  This way I can go back later and price match future purchases and keep track of past prices compared to current ones.  This helps me to know if I am getting a good deal.


3.  Buy In Bulk

There are SO many benefits to buying in bulk.  If you shop smarter, with bulk buying you will save money, keep a well stocked pantry and shop less often.  Shop at your local health food stores.  We have a really great little family-owned health food store in my area that I love.  They offer bulk bin shopping for things like nuts and nutritional yeast and if I want to order something by the case like dairy-free yogurt they give me a nice discount on my order.  You can also shop online for your bulk items too.  I often shop at Amazon for my gluten-free rice, tapioca, corn and potato flours that I use to make my gluten-free flour blend.

4.  Knowing Good Substitutes For Gluten and Dairy

There are LOTS of options out there for gluten and dairy replacements in your meals and recipes.  Gluten flours can be replaced with rice, oat, bean and nut flours.  There are tons of gluten-free pastas, dessert mixes, cookie and brownie mixes, chips, crackers and more available.  Aldi is a GREAT place to find gluten-free options for your favorite foods.  Dairy lovers can replace milk with plant-based milk like almond (my favorite), cashew, soy, rice.  Nutritional yeast gives dishes a really nice cheesy flavor.  When combined with other ingredients you can make dairy-free cheese sauces and dairy-free parmesan cheese.


5.  Focus On Whole Foods

So many foods are naturally dairy and gluten free that you can have a really great diet with a wide variety of good food just by focusing on eating whole, unprocessed or minimally processed foods.  Processed foods contains a lot of unnecessary ingredients that our bodies don’t need, especially gluten because it is used as a stabilizer in a lot of processed foods.  Instead focus on things like chicken, lean red meats, fruits and vegetables, rice, gluten-free oats, potatoes, quinoa, dairy-free milks and cheeses.  Your body will thank you.

6.  Save Money By Making Your Own Convenience Foods


Take the time to learn how to cook and bake gluten and dairy-free.  So much money is wasted on prepackaged foods.  This is just as much of a problem, if not more so, for someone who has food restrictions.  Gluten free baking like cookies, breads and , snacks and desserts can be super tricky, but it is worth the time and effort to learn how to make these items yourself instead of purchasing expensive prepackaged versions.  Not only will you save money, you will avoid the added unhealthy chemicals and preservatives that a lot of these foods have.  


Gluten Free Biscuits


After going gluten-free over two years ago I have struggled in the bread baking department. Gluten-Free baking is NOT like regular baking.  You practically have to be some kind of mad-scientist chemist sort of person to be able to successfully recreate regular bread recipes into gluten-free recipes successfully.  If you've been there then you know how real the struggle is.  Can I get an amen?

Where's The Meat No Beef Gluten-Free Vegan Hamburger Meatless Patties


After creating my no-beef crumbles recipe that is vegan, soy-free, nut-free, dairy-free, gluten-free and egg-free, I loved it so much that I used that recipe to create a meatless patty.

This recipe is the BOMB when it comes to ground meatless patties.  It taste great.  It holds it's shape well.  It has a good chew and bite to it and is the closest thing I have tasted to replicated ground meat.  Does it taste like beef?  NO, but when it is served on a hamburger bun with ketchup, mustard, minced onion and pickles it sure does taste a lot like a McDonalds hamburger.   If you are looking for a meatless burger this fits the bill for BB Q's, quick lunches or dinners, Salisbury steaks, meat loaf, hot dogs and more!  This also freezes well.

Lentil Vegetable Loaf


I stopped eating ground beef almost five years ago after having my gall bladder removed.  I learned very quickly that my body can no longer tolerate greasy, fatty or fried foods.  It has taken a long time to develop recipes that would replace the ground beef in certain recipes.  I finally came up with the perfect meatless ground meat substitute that works great for any recipe where ground meat would be used.  I even use it for hamburgers.  But, it just doesn't work right for meatloaf.

I kept working with different ingredients and tweaking recipes until I came up with the perfect meatless meatloaf.    To keep this recipe totally vegan you can use one flax egg in place of the regular egg.  This recipe is made with cooked lentils, bread crumbs, grated carrot, onion, red bell pepper and celery and just the right amount of seasonings.  The SOFT bread crumbs in this recipe really help give this meatloaf a lighter texture and helps keep if from being too dense.  This has become my go-to "meatloaf" recipe that we have at least twice a month.

Preheat your oven to 400 degrees.

First place the cooked lentils into a large bowl and lightly mash them.  You could use a potato masher for this step, but I just use my washed, clean hands.  Next add the rest of the ingredients to the lentils.  For the vegetables, I throw them in my food processor and pulse them until they are a grated consistency, but you can totally do this by hand.


Next, thoroughly mix the lentil mixture.  Again, you could use a spoon, but I just use my hands.


Finally, scoop the mixture in to a baking sheet lined with foil or parchment paper.  It will be very loose.  Using your hands, shape the mixture in the pan into a loaf shape.  Top the loaf with ketchup.  Cover with foil and bake at 400 degrees for 45 minutes.

This is so good served with baked or mashed potatoes, oven roasted garlic broccoli and biscuits.


Lentil Loaf        Printer Friendly-Click Here
2 1/2 cups cooked lentils, lightly mashed
1 1/2 cups SOFT bread crumbs
Grated:  1 medium carrot, 1 stalk celery, 1/4 each bell pepper and onion
one egg OR one flax egg
1/4 cup tomato juice
2 tsp. garlic powder
2 tsp. onion powder
Salt & Pepper to taste

Preheat your oven to 400 degrees.

First place the cooked lentils into a large bowl and lightly mash them.  You could use a potato masher for this step, but I just use my washed, clean hands.  Next add the rest of the ingredients to the lentils.  For the vegetables, I throw them in my food processor and pulse them until they are a grated consistency, but you can totally do this by hand.  Next, thoroughly mix the lentil mixture.  Again, you could use a spoon, but I just use my hands.
Finally, scoop the mixture in to a baking sheet lined with foil or parchment paper.  It will be very loose.  Using your hands, shape the mixture in the pan into a loaf shape.  Top the loaf with ketchup.  Cover with foil and bake at 400 degrees for 45 minutes.


Printer Friendly-Click Here

Love life and be well,


Bread Machine Honey Oat Bread


Nothing tastes better than fresh, homemade bread straight from the oven, right?  But, who has the time or patience to make it from scratch?  For years I used to make all of our bread by hand.  I would make four to six loaves at one time and put them in the freezer.  And then, one day, I discovered.........drum roll...........THE BREAD MACHINE!!!!

Oh my goodness!  Can we say, LIFE CHANGER!!!!  I love being able to just throw all of the ingredients into the machine, turn it on, and a few hours later my house smells like heaven bathed in fresh baked bread aroma!  My $.90 cent bread machine find at the local Goodwill was like finding a gold bar in a gold mine and has forever changed how I make bread and any kind of dough that needs to be kneaded.


Did I mention how incredibly EASY it is to make bread in a machine? I mean, like ridiculously easy.  Seriously, just dump in the ingredients and turn it on!  Before we begin, it is important to know that although this is a "dump and go" recipe, the ingredients need to be added to the bread machine in the order that they are listed in the recipe.  So, let's jump right into the recipe and make us some bread!  

First, we are going to add the water, honey, oil and lecithin granules to the bread machine pan.  The lecithin granules are optional, BUT they make a HUGE difference in the out come of your bread.  It is a stablizer that will help your bread stay softer and fresher longer.  I stir it around a bit with a spoon to let the lecithin dissolve.


Next, add the oats.  I have used rolled quick oat for this recipe in the past and they work if that is all you have on hand.  But, I prefer whole oats.


 Now, we are going to add the salt, flour, yeast and vital wheat gluten.


That's it!  SERIOUSLY!  Just close the lid, program the bread machine and hit the start button.  A few hours later you house will be permeating with the smell of bread.


I use the rapid cycle on my machine, so two hours and twenty minutes later your bread should look something like this when you lift the lid of your machine.


Here is the lecithin granules that I use.  I bought them from my local health food store.


This is a basic bread machine recipe that will work in just about any machine.  You can also make this by hand if you don't have a machine.  So, now that you have this awesome recipe, go forth and make lots of bread!


Bread Machine Honey Oat Bread

1 1/2 cups warm water
2 tbsp. lecithin
1 1/2 tbsp. oil
1/4 cup raw honey
1 1/2 tsp. salt
1 cup oats
3 1/2 cups unbleached white flour
2 1/2 tsp. yeast
1 tsp. vital wheat gluten

Add the water, honey, oil and lecithin granules to the bread machine pan.  Next, add the oats.  Add the salt, flour, yeast and vital wheat gluten.  Close the lid, program the bread machine and hit the start button.  At the end of the cycle you machine may have a keep warm function that kicks in.  You can leave your bread in the machine to stay warm, but I take mine out of the machine as soon as the bread is baked.  I let the pan sit and cool for about 10 minutes, before removing it from the pan to cool.


Where's The Meat No Beef Gluten-Free Dairy-Free Vegan Hamburger Style Crumbles


I have been on a healthier eating journey for four years since having my gall bladder removed that caused me to have digestive issues.  One of the first things to go out of my diet was beef and ground beef.  I simply could not (and still can't) digest the fat in it.  Giving up ground beef meant no more hamburgers and since Saturday nights are hamburger and french fry nights at my house, that just wasn't going to fly.

I have made all kinds of substitutions from grinding up chicken breast and making patties, using lentils for tacos, and just plain ole' skipping the meat all together in dishes that require a ground beef. I've even tried the store bought vegan crumbles and they were, well, nasty.

So, in my quest to find an alternative that I could make at home, I accidentally stumbled upon this creation when I made my vegan meatballs.  I made some adjustment to the original recipe, did some trial and error cooking sessions, and finally came up with the best vegan ground meat substitute that I have ever had!  It's true!!  This recipe is holds it's shape and ground meat consistency when added to soups stews and sauces.  It freezes well.  I usually divide the mixture in half and make some of it into meatless hamburger patties and the other half into meatless crumbles.  SCORE!!!  Now, let's see the recipe.

Before you start, preheat your oven to 350 degrees.

In a large bowl you will blend up the oat flour, Italian seasoning, salt, pepper, regular or Nut-free Vegan Parmesan cheese, dry onion flakes, garlic powder and paprika.


I use dehydrated mushrooms for this recipe.  But I have used cooked mushrooms as well.  The dehydrated mushrooms added dry just give this recipe such a great chewy meaty textture.  If you are using dehydrated mushrooms just roughly crumble them dry into your dry ingredients.

If you are using cooked mushrooms this recipe with still be amazing, but the meaty, chewy texture won't be as much as with dehydrated mushrooms. In a food processor, grind up the cooked mushrooms until they are a very fine mince.


Add the ground mushrooms, tomato paste, egg, liquid smoke and water to the dry ingredients and stir until the mixture is thoroughly combined.


Using wet hands, break the mixture up in small pieces and place on lined baking pans.  Place the baking pans in the oven and bake for about 45 minutes until they are golden brown and crispy.   As the crumbles cook, you may need to take them out every so often and break any larger chunks up.

Heat up some water, veggie broth, beef or chicken broth or bullion in a large pot on the stove.   Bring the liquid to a boil and add the crumbles.  Cook them for about 15 minutes.  Then remove them with a slotted spoon and put them back onto the parchment lined baking sheet.  Sprinkle them with salt and pepper.   Cool them completely.  Flash freeze them in the freezer and then place them into two Ziploc bags. You will be amazed at the resemblance of ground meat that this has.


Where's The Meat No Beef Patties

Serve with mustard, ketchup and pickles and a side of french fries for a real fast-food treat at home.

Prep Time: 20 mins

Cook Time: 55 mins

Total Time: 1 hr 15 mins

Makes: 10 to 12 servings


INGREDIENTS

4 cups oat quick oats

1 tbsp. Italian seasoning

1 tsp. salt

1/4 tsp. black pepper

3 tbsp. Nut-free Vegan Parmesan cheese or regular Parmesan cheese

1 tbsp. dry onion flakes

1 tsp. garlic powder

1 tbsp. paprika

12 oz.  cooked mushrooms, drained (canned mushrooms work fine)

2 tbsp. tomato paste

1 tbsp. ground flaxseed

2 cups water, vegetable broth, beef or chicken broth or bullion


INSTRUCTIONS

  1. In a large bowl you will blend up the oat flour, Italian seasoning, salt, pepper, Nut-free Vegan Parmesan cheese, dry onion flakes, garlic powder and paprika. 

  2. In a food processor, grind up the cooked mushrooms until they are a very fine mince. 

  3. Add the ground mushrooms, tomato paste, egg or ground flaxseed, liquid smoke and water to the dry ingredients and stir until the mixture is thoroughly combined.  

  4. Using wet hands shape 1/2 cup handfuls of the meatless ground meat into patties and place them onto a baking sheet lined with parchment paper. 

  5. Place the baking pans in the oven and bake for about 45 minutes until they are golden brown and crispy.

  6. Heat up the water, veggie broth, beef or chicken broth or bullion in a large pot on the stove.  

  7. Bring the liquid to a boil and add the patties.  Cook them for about 10 minutes.  Then remove them with a slotted spoon and put them back onto the parchment lined baking sheet.  Sprinkle them with salt and pepper.   

  8. Cool them completely.  

  9. Flash freeze them in the freezer and then place them into two Ziploc bags. 

TO SERVE


Put a frying pan on medium high heat and add some oil or spray with non-stick spray (I use the spray).  Brown the patties on both sides in the skillet until they are a light golden brown.


NOTES -------------------------------------------------------------------------------

 I use an ice cream scoop to help get an even amount for each patty.  


Did you make this recipe?  
Tag me @wherefoodandfamilymeet on Instagram!
Did you find this blog post helpful?  Share it with your network!